This guide covers the native integration between Yay! Forms and Meta Ads (Facebook Ads). Yay! Forms sends events through Meta’s Conversions API, server to server, so your conversion data arrives even when browsers block tracking scripts. You will connect your pixel, understand every setting in the integration, and run the final checks that make events actually appear in Meta. No code or Google Tag Manager involved.
The integration screen is organized in four numbered steps, and this article follows the same order:
- Connect your Meta Pixel: pixel ID and access token
- Configure Settings: advanced matching and field mapping
- Custom Conversions: events with your own name and trigger condition
- Confirm your Meta setup: test event delivery and the two Meta-side settings that block most setups
Prerequisites
- A Yay! Forms account on the Plus or Professional plan, with a form created.
- A Meta business account with a pixel (dataset) created in Events Manager.
- For advanced matching to shine: a form that captures data such as name, email, or phone.
1. Open the integration
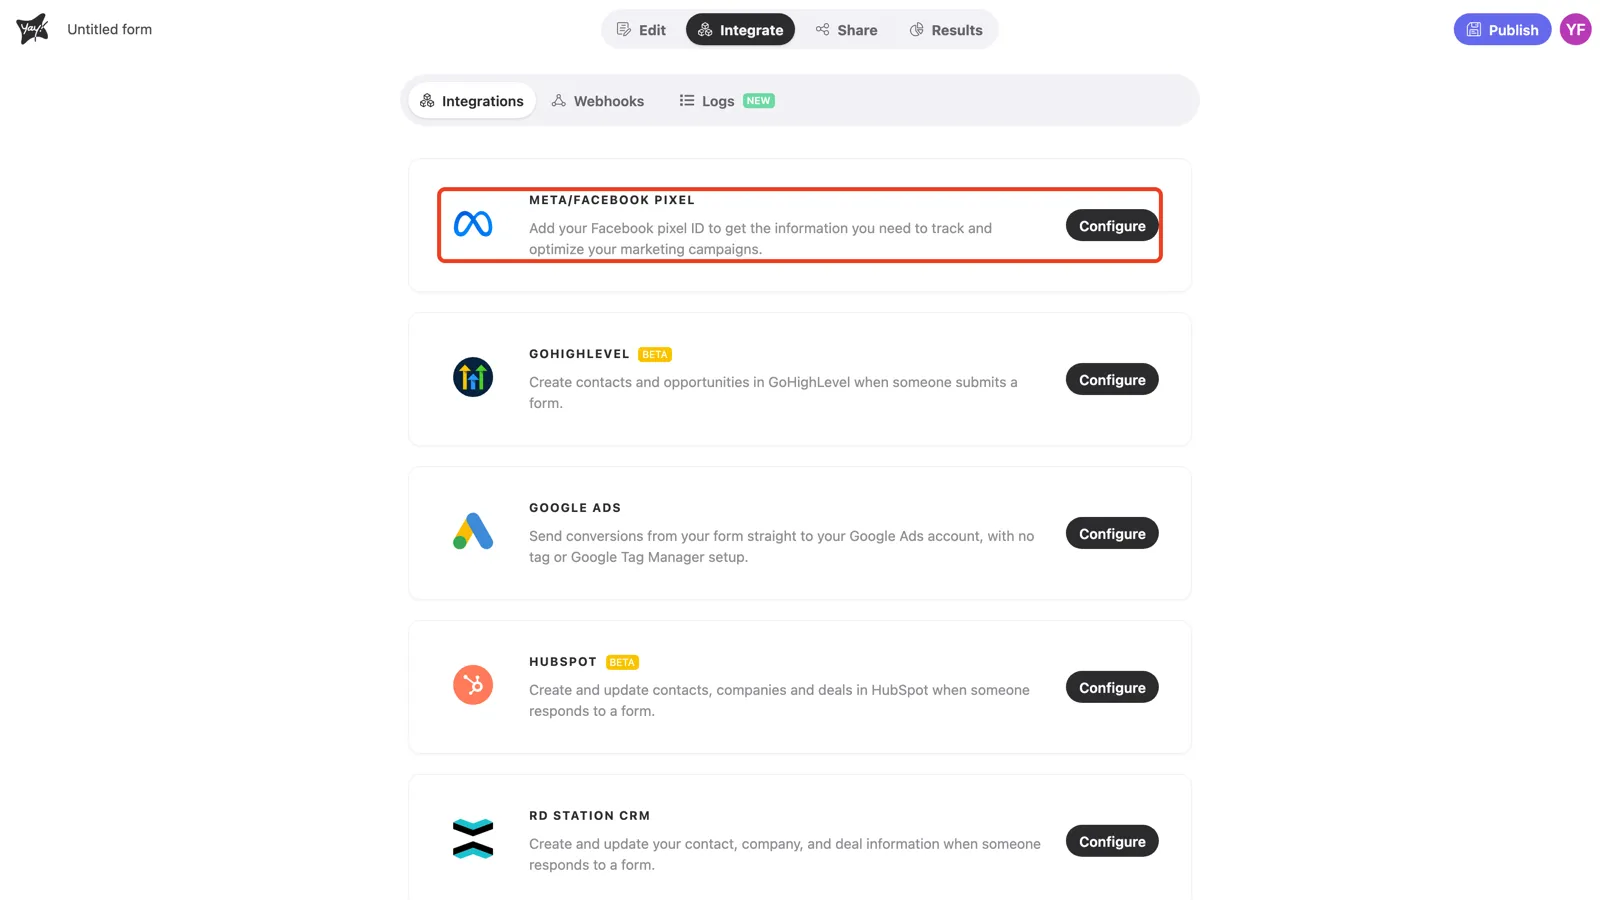
Open your form and select the Integrate tab. The Meta/Facebook Pixel card is at the top of the list. Click Configure.
2. Step 1: Connect your Meta Pixel
The modal opens on step 1. Click Connect Meta account…
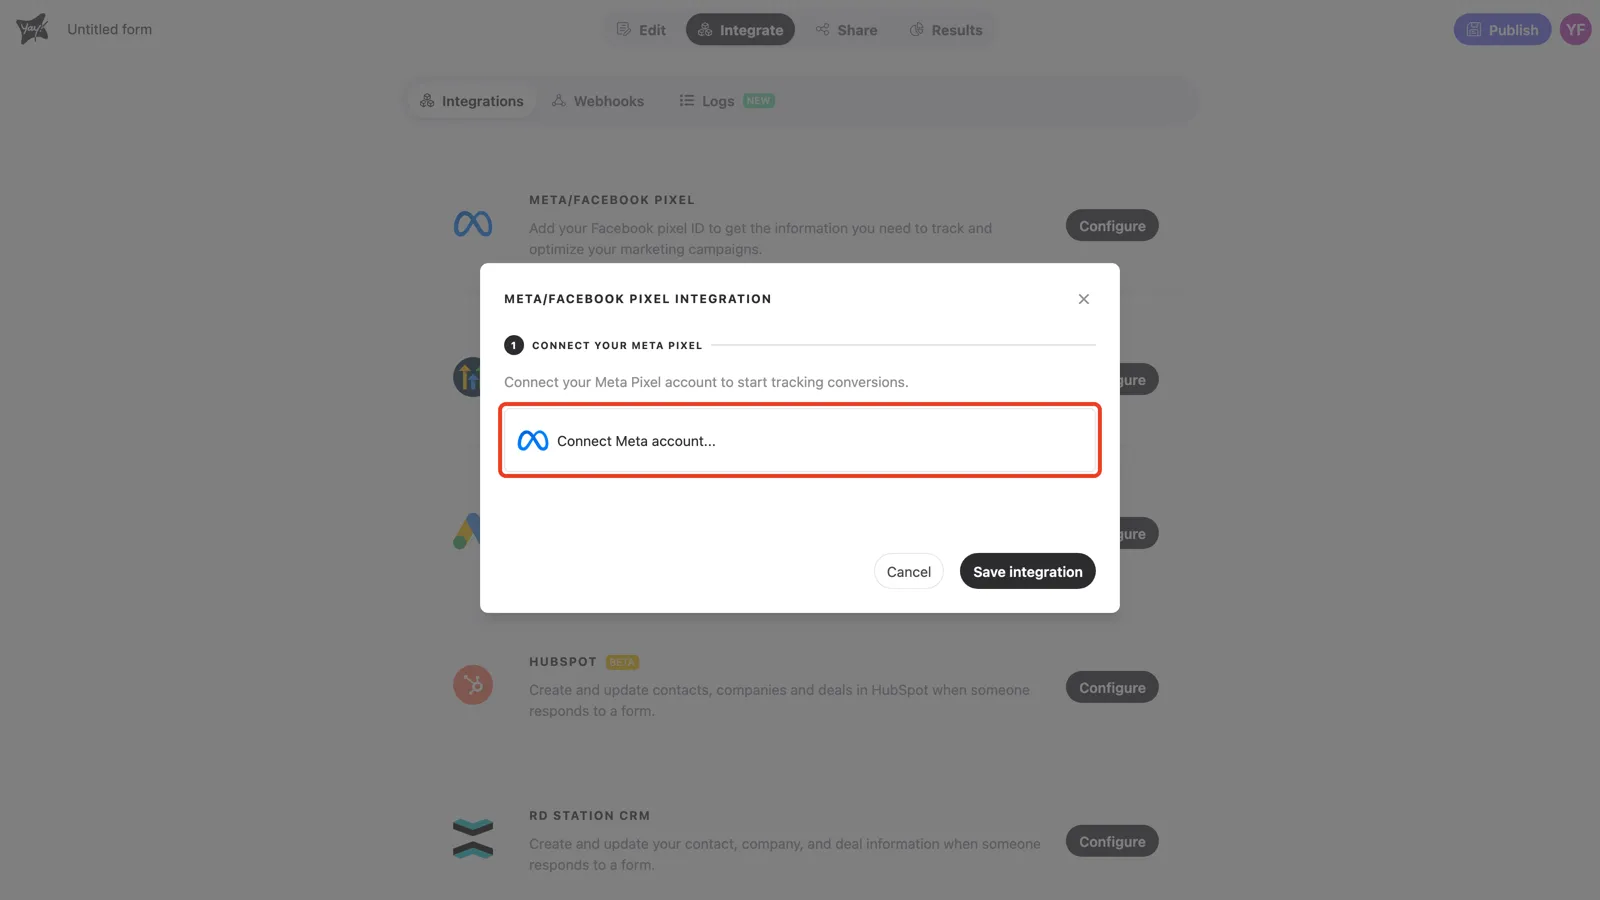
Yay! Forms asks for three pieces of information. The pixel ID and the access token come from Meta’s Events Manager:
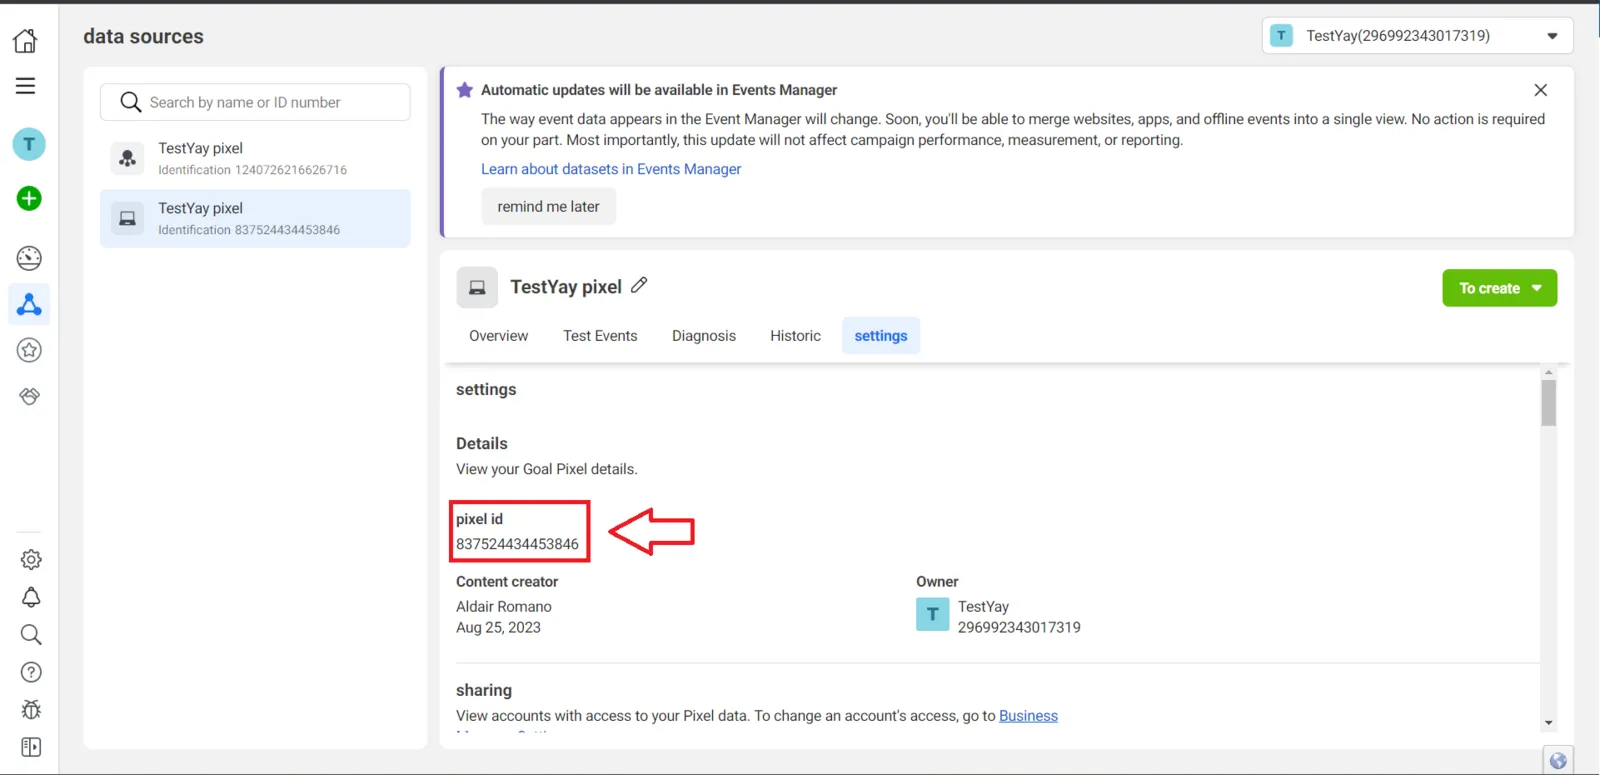
- Pixel ID: in Events Manager, select your pixel under Data sources and open the Settings tab. The ID is listed under Details (a long number, e.g. 2818027576142479).
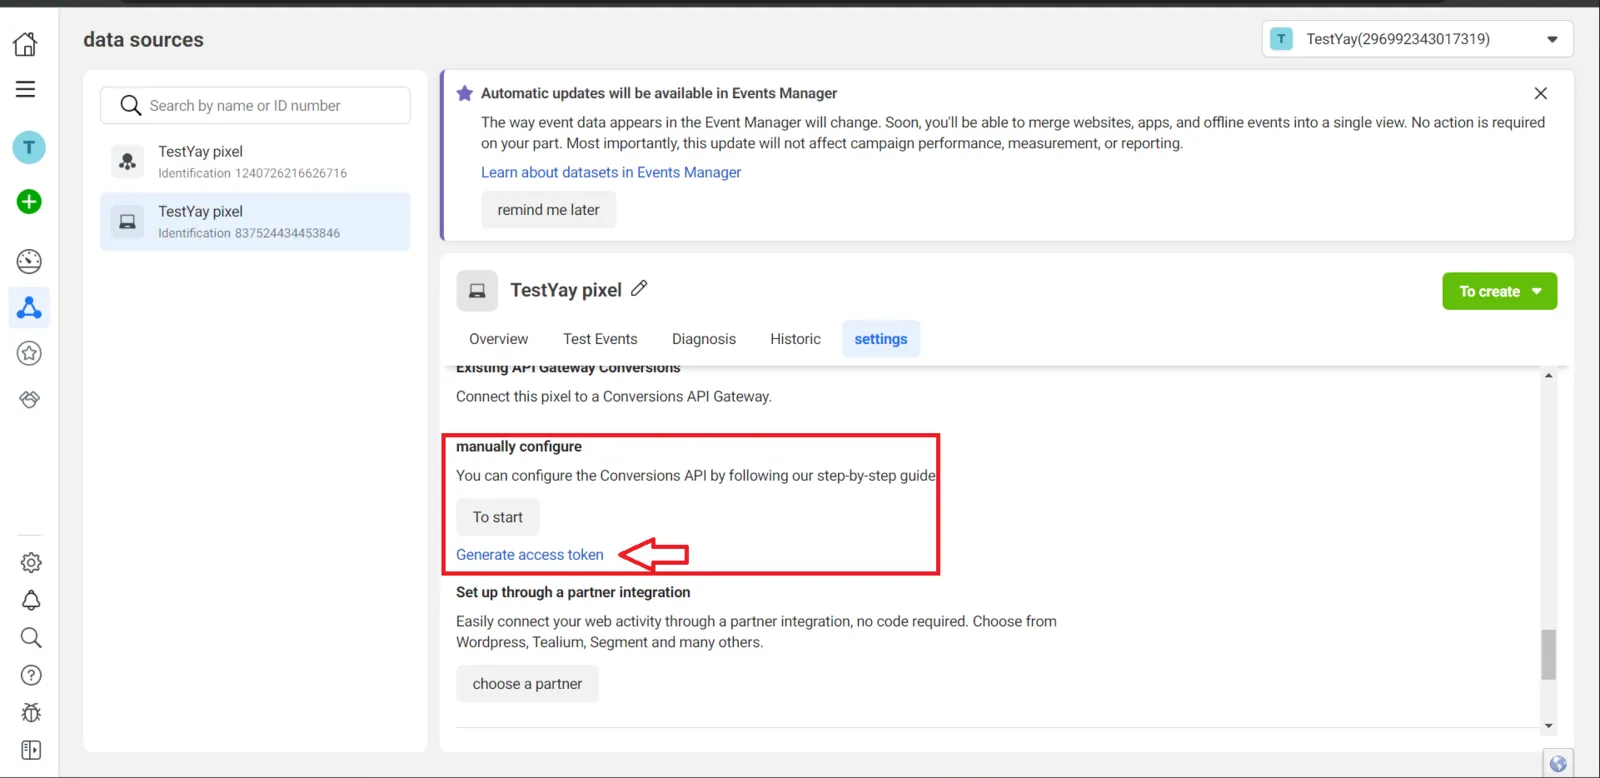
- Access token: on that same Settings tab, scroll to the Conversions API section and click Generate access token under “Set up manually”. Copy the generated token.
Back in Yay! Forms, fill in the Meta Settings form and click Save:
- Pixel Name: any name to identify this pixel inside Yay! Forms (e.g. “Acme launch pixel”).
- Meta/Facebook Pixel ID: the number you copied.
- Meta/Facebook Access Token: the token you generated. It is stored encrypted.
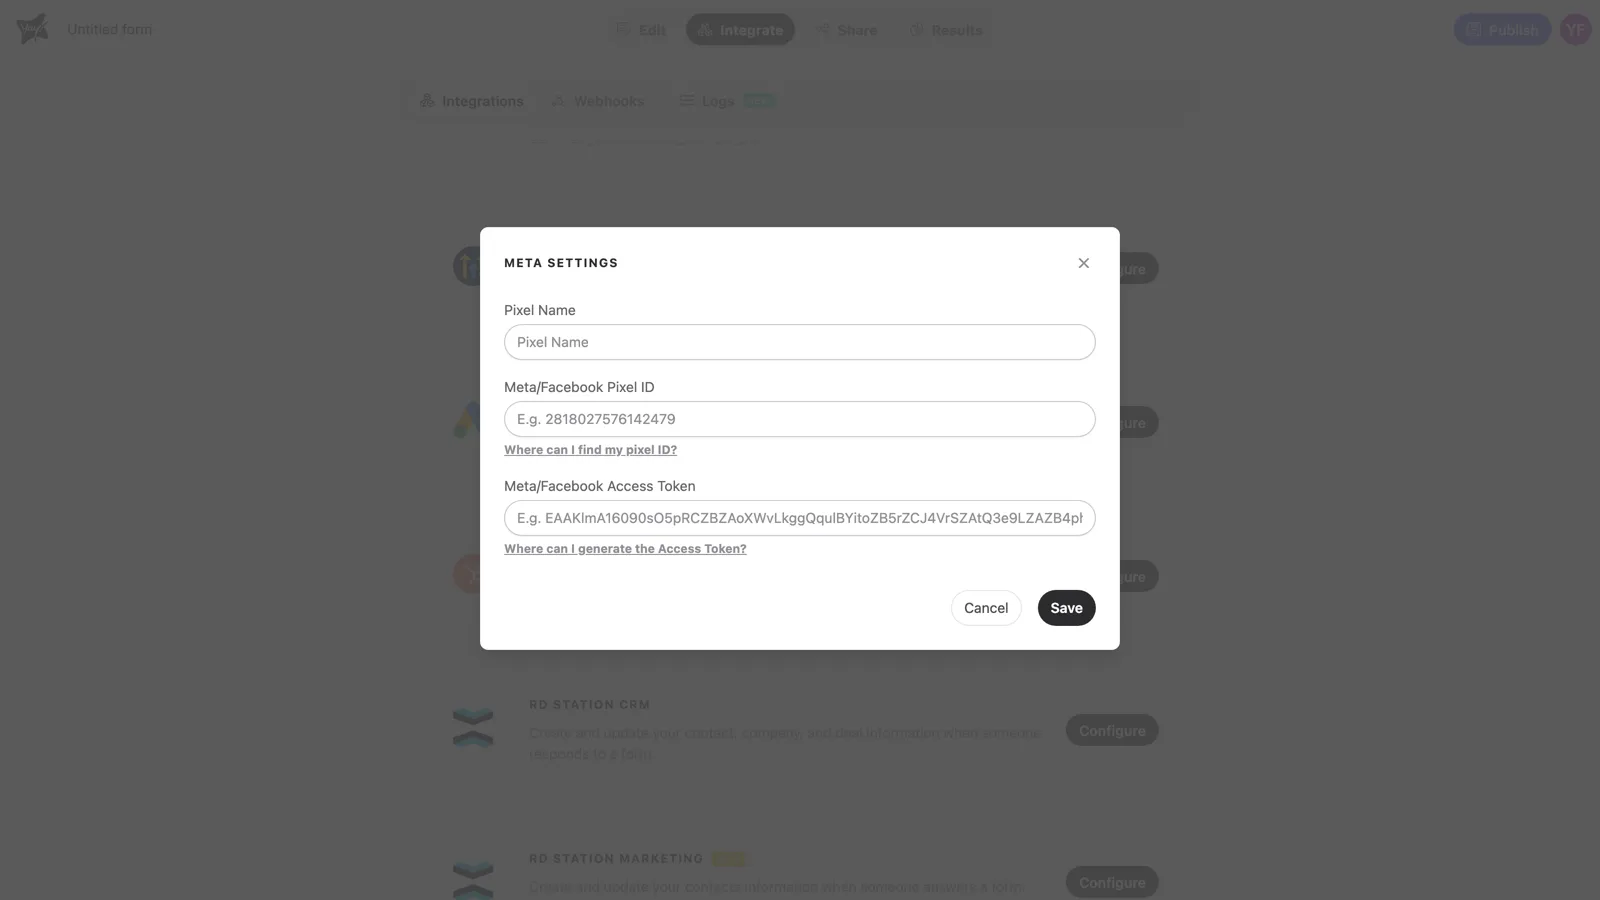
When you save, Yay! Forms fires a validation event at Meta using these credentials. If the ID or token is wrong, the save fails on the spot, so a connected pixel means the Conversions API link is already working.
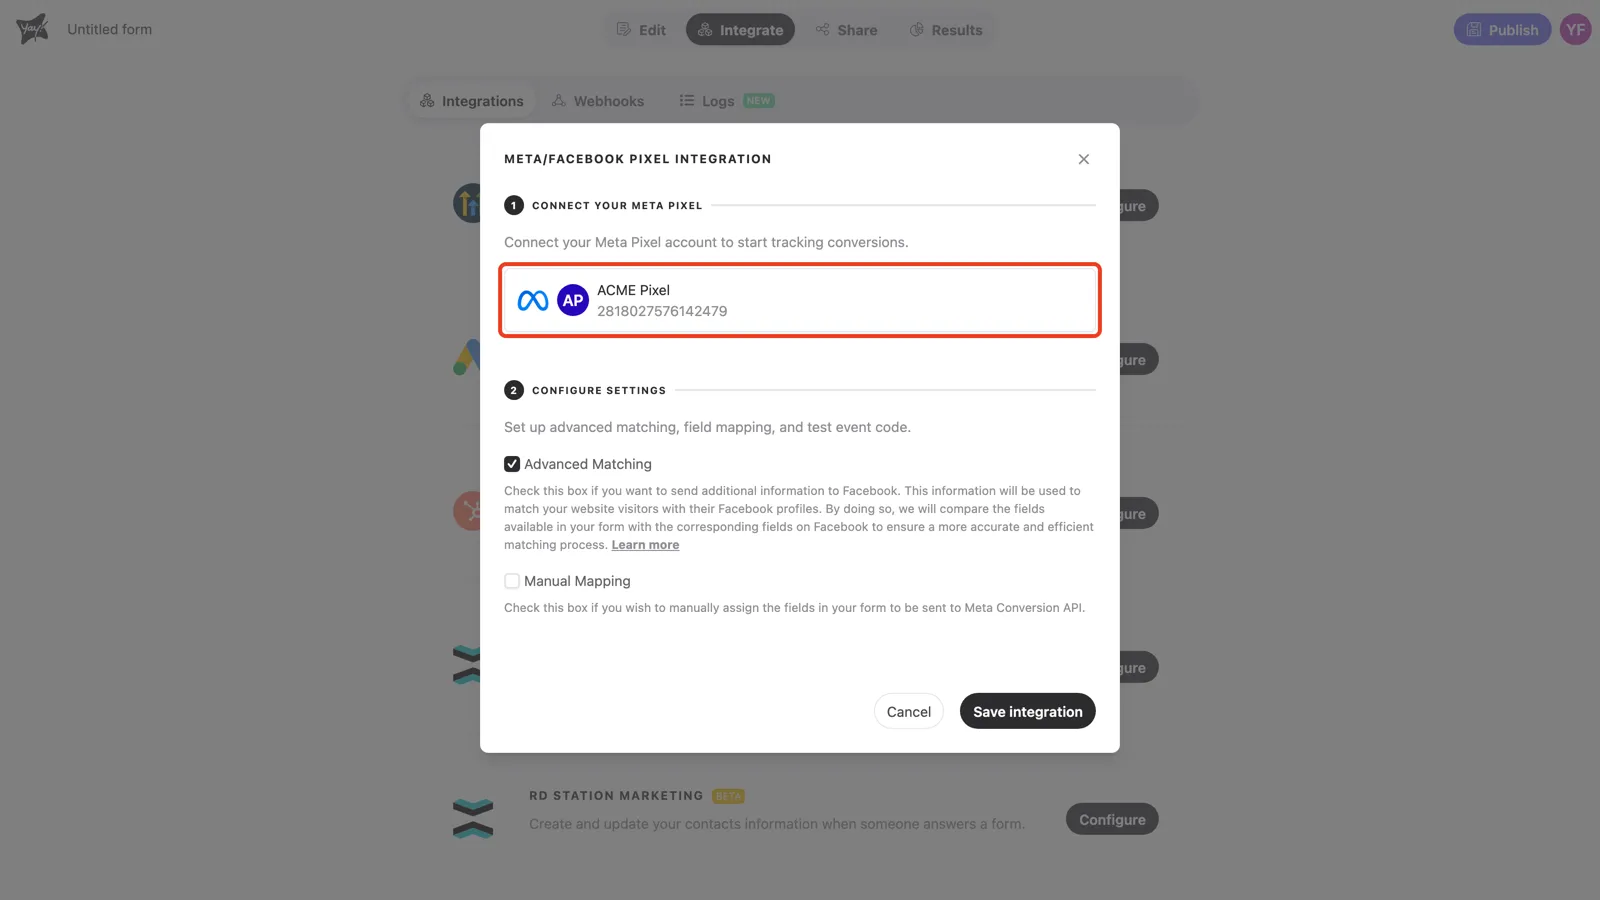
Once connected, the pixel appears as a card in step 1 and the remaining steps become visible. The credential is saved to your workspace: other forms can select this same pixel from the dropdown instead of entering the data again.
3. Step 2: Configure Settings
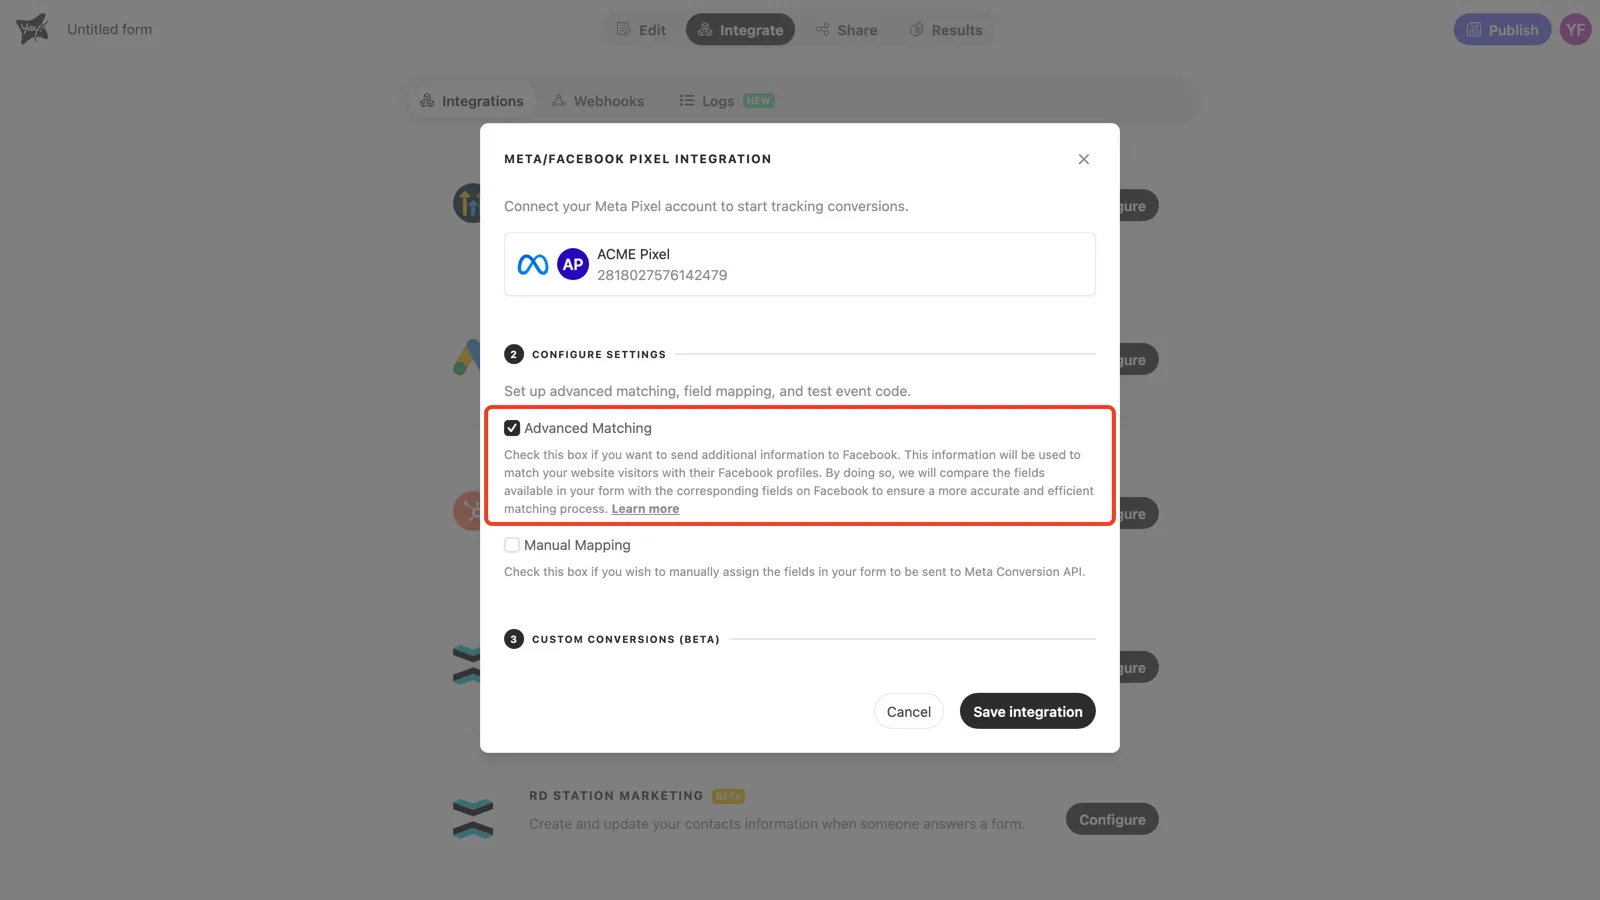
Advanced Matching
Advanced Matching comes enabled by default, and for most forms it should stay on. Yay! Forms detects fields compatible with Meta’s matching data (email, phone, first and last name, date of birth) plus the respondent’s approximate location, and sends them with each event in the hashed format Meta requires. Meta uses this data to match the event to a real profile. The payoff is a higher event match quality score, which means better attribution and more complete custom audiences.
Manual Mapping and Field Mapping
Enable Manual Mapping when you want to control exactly which form field feeds each Meta parameter, instead of relying on automatic detection. A mapping table appears: pick a source field on the Yay! Forms side (questions, hidden fields, tracking parameters, and variables all qualify) and a destination field on the Meta side. Click Add Field for more rows.
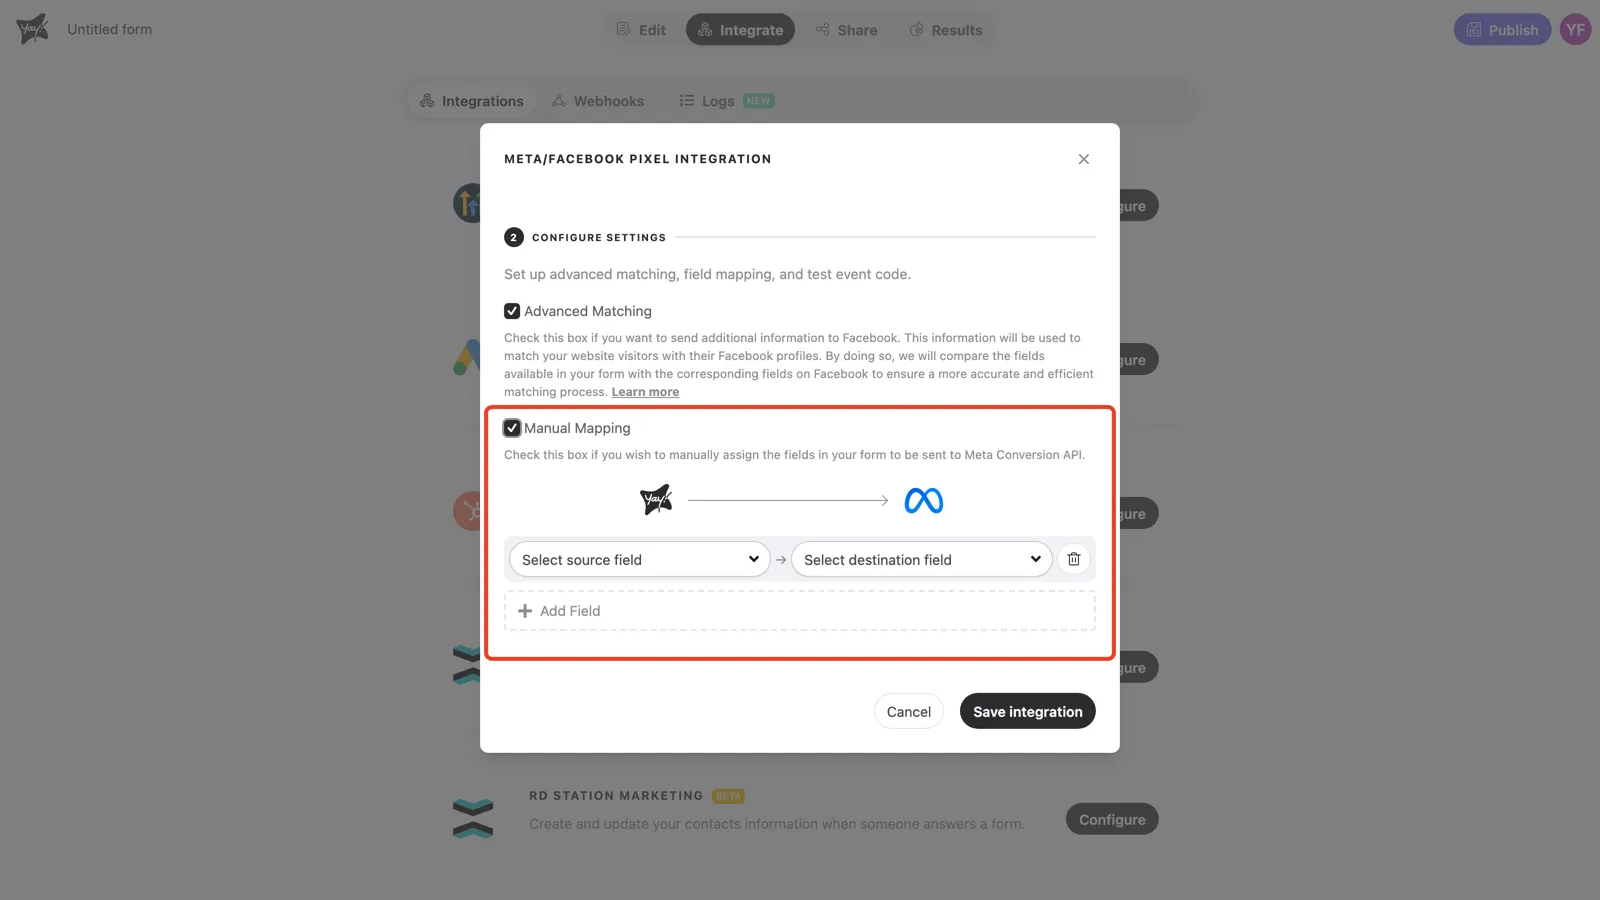
The destination list covers Meta’s user and purchase parameters: First Name, Last Name, Email, Phone, Gender, Date of Birth, City, State, Zip Code, Country, Value, Currency, Content Name, Content Category, Delivery Category, and Order ID. Two situations call for it:
- A field Yay! Forms can’t auto-detect (e.g. a dropdown that holds the respondent’s city).
- Value-based campaigns: map a calculated variable to Value (and set Currency) so Meta can optimize for purchase value, not just conversion count.
Manual mappings take precedence over advanced matching when both resolve the same parameter.
4. Step 3: Custom Conversions (Beta)
By default, Yay! Forms sends its own events (listed in the events table further down). Custom conversions let you send events with your own name, optionally gated by a condition. The classic use case is a “QualifiedLead” event that only fires when the answers meet your criteria, so your campaign optimizes for the leads you actually want.
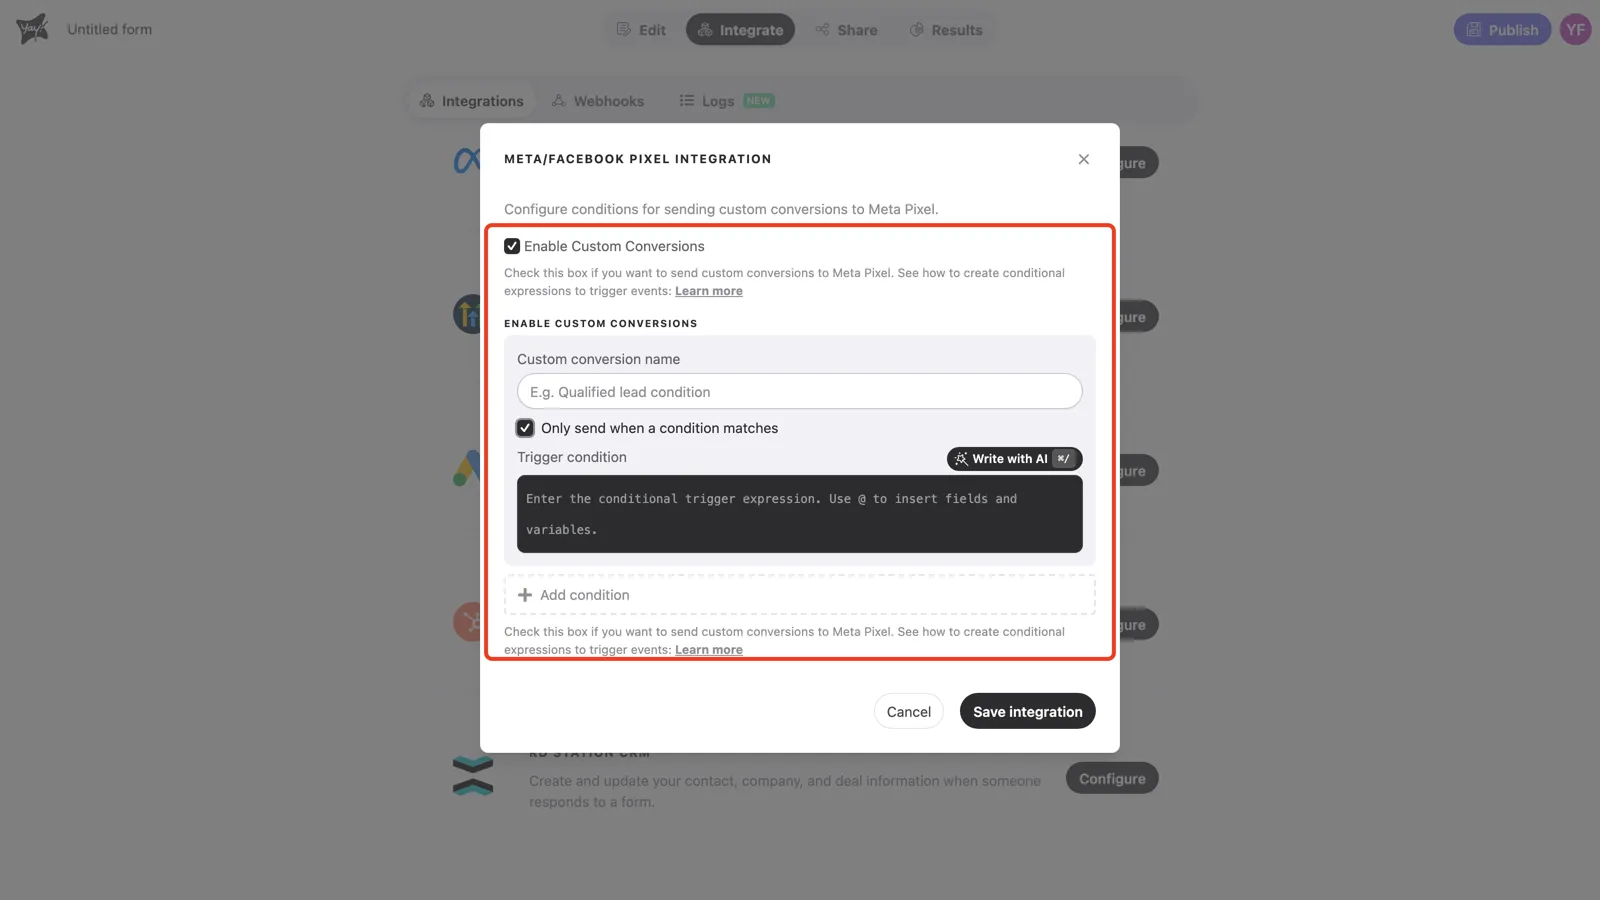
Check Enable Custom Conversions and fill in the card that appears:
- Custom conversion name: this is what arrives in Meta as the event name, adjusted to Meta’s format (accents become plain letters; spaces, emoji, and other symbols are removed; 40-character cap). Stick to letters, numbers, hyphens, and underscores and the name arrives exactly as you typed it.
- Only send when a condition matches: leave it unchecked to send the event on every submission. Check it to reveal the Trigger condition editor, where you write an expression with the form’s fields and variables. Type
@to insert a field, or click Write with AI to describe the rule in plain language and get the expression written for you. The full expression syntax is in How to create expressions for conditional integration execution. - Add condition: creates another custom conversion, each with its own name and condition.
- Case-insensitive trigger condition: makes the comparison ignore capitalization, so “I Accept” and “i accept” evaluate the same.
5. Step 4: Confirm your Meta setup
This final step exists because a perfectly configured integration can still show zero events in Meta. Two Meta-side settings silently discard incoming events, and this step makes you confirm both before saving. The third box is not about events: it is a campaign recommendation that stops you paying for clicks that never become leads.
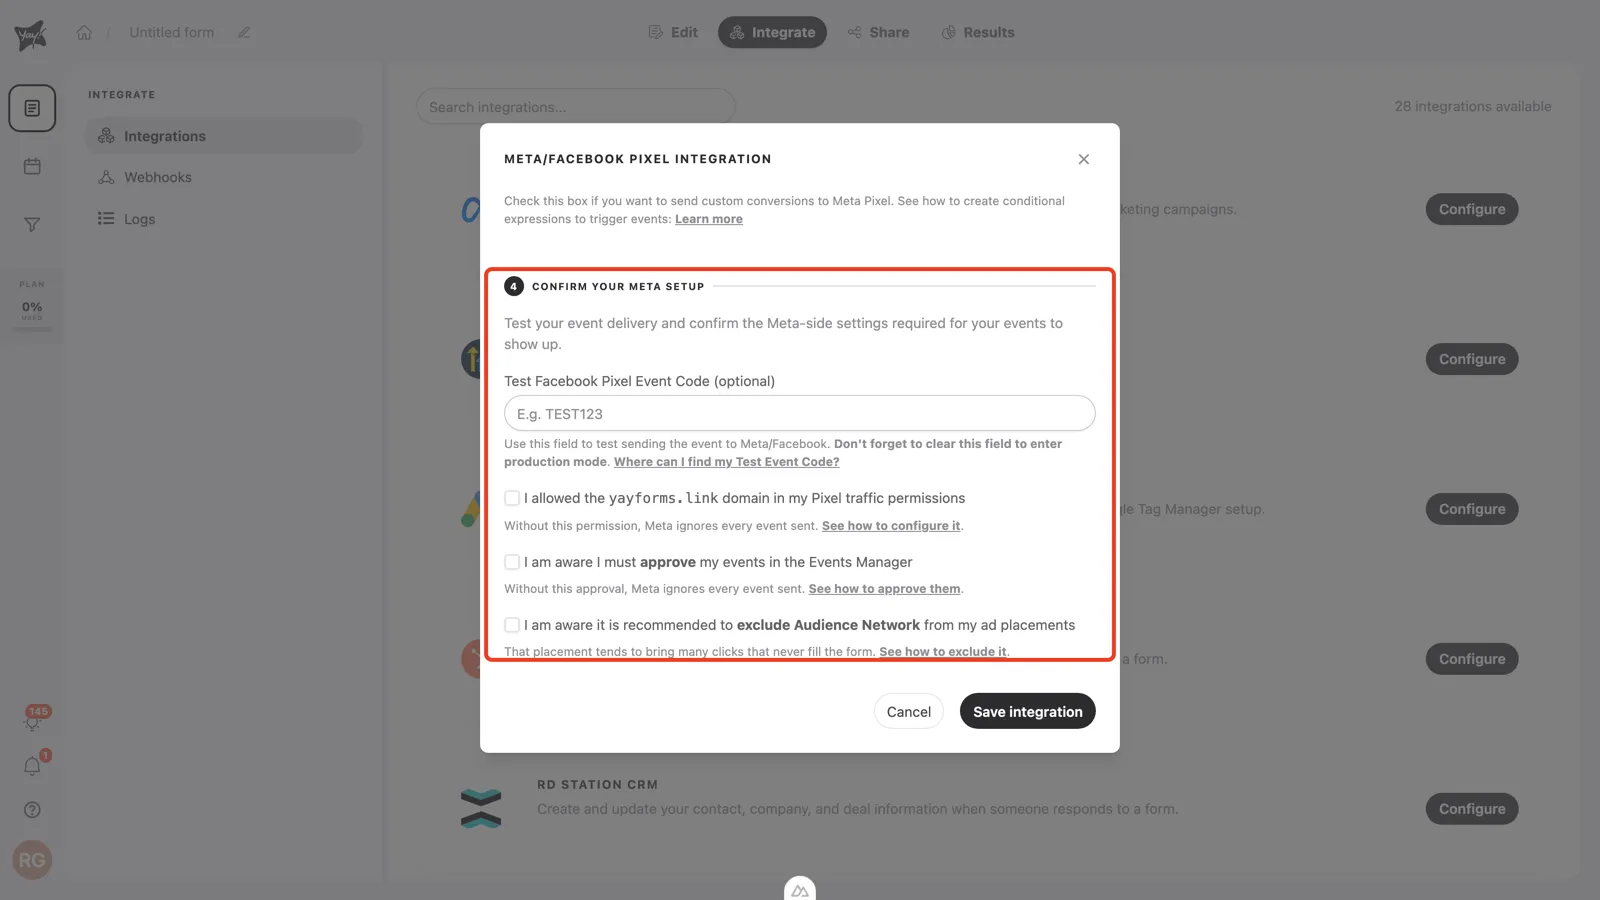
Test your event delivery
The Test Facebook Pixel Event Code (optional) field lets you watch events arrive in real time. In Events Manager, open the Test events tab of your pixel and copy the code shown there (e.g. TEST123):
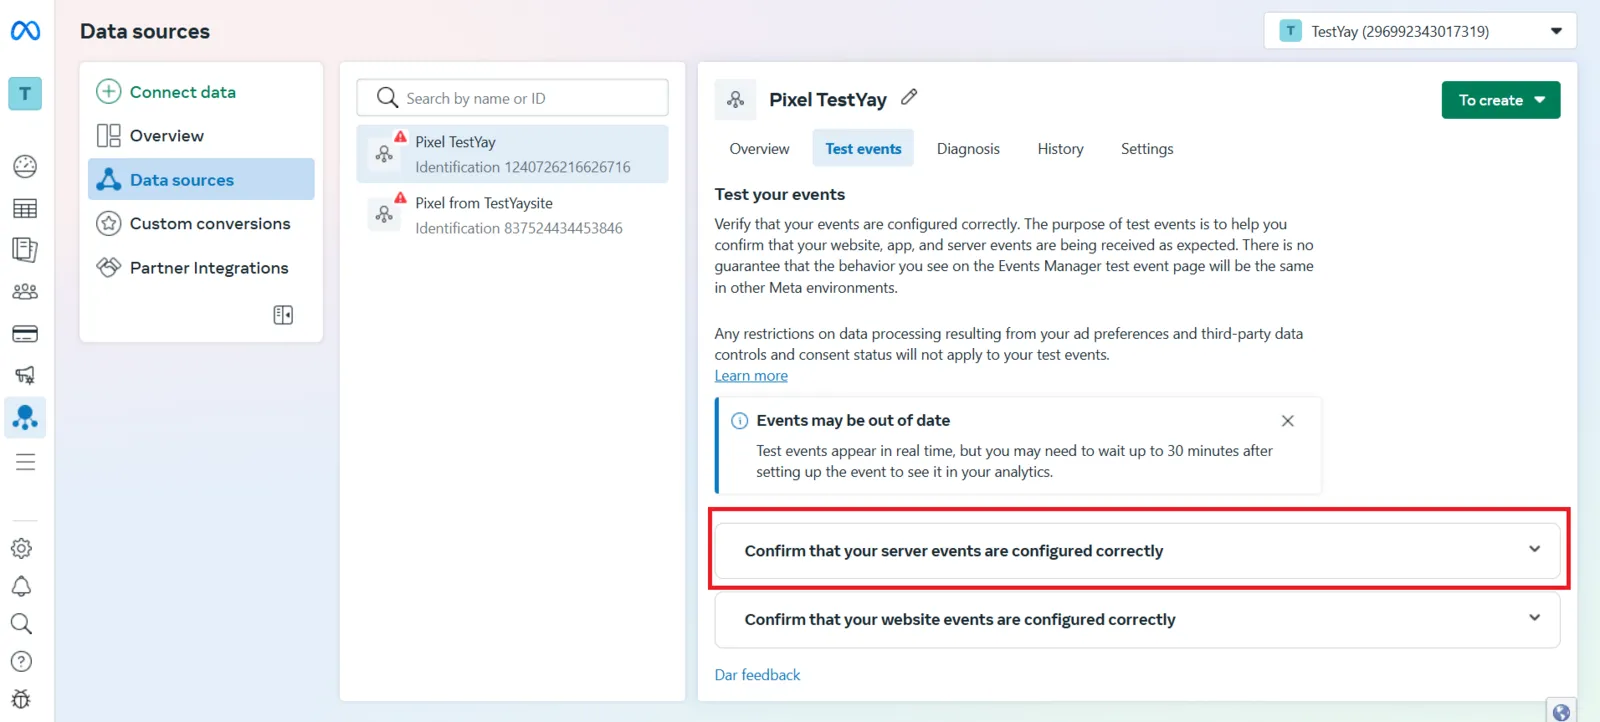
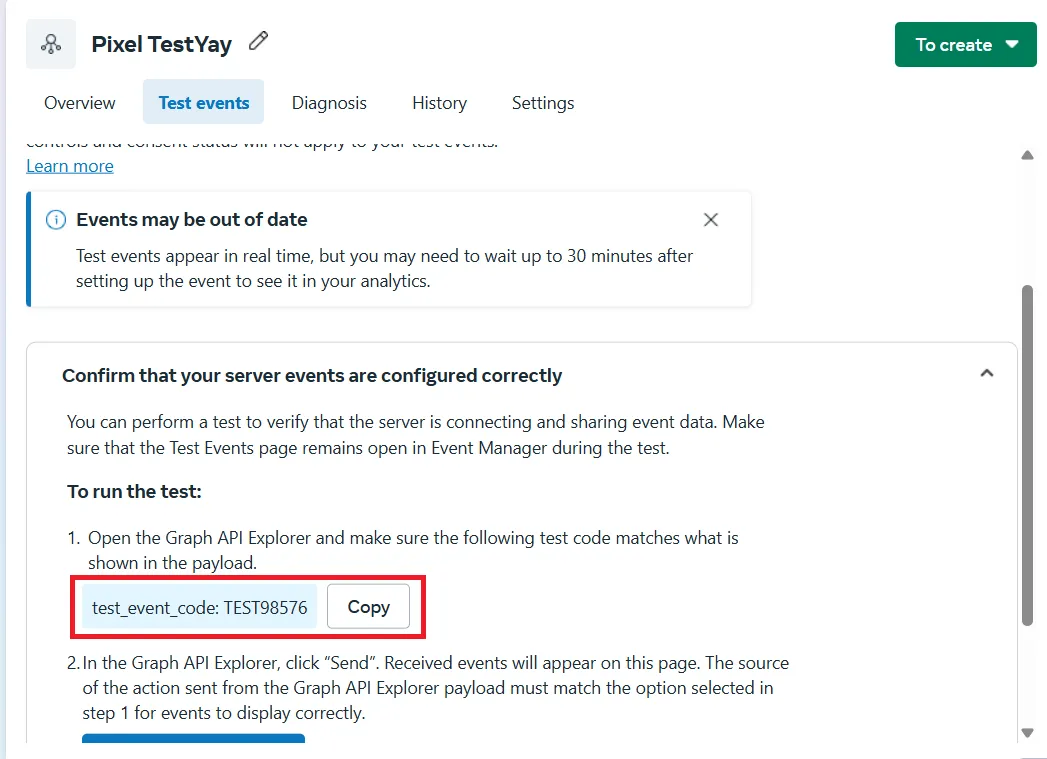
Paste the code into the field, save the integration, and submit a response to your published form. The events usually show up in the Test events tab within minutes (Meta quotes up to 30).
”I allowed the yayforms.link domain in my Pixel traffic permissions”
If your pixel has an Allow List in its traffic permissions and yayforms.link is not on it, Meta drops every event from your forms with no error anywhere. In Events Manager, open your pixel’s Settings tab, scroll to Traffic Permissions, and confirm either that no allow list exists or that the list includes yayforms.link and your form’s exact address (your-subdomain.yayforms.link; Meta can treat subdomains as separate domains), plus your custom domain if you use one. The complete walkthrough is in How to configure traffic permissions for your Meta Pixel. Once confirmed, check the box.
”I am aware I must approve my events in the Events Manager”
The first time Meta receives a new custom event (YFSubmit, YFStart, YFView, YFAnswer, YFIncomplete, or one of your custom conversions), it parks the event as “Blocked by Meta” until the pixel owner reviews it. Blocked events can’t be used in campaigns, custom audiences, or conversion tracking. To approve them: pixel Settings tab → Manage Event Blocking → Review → confirm each event.
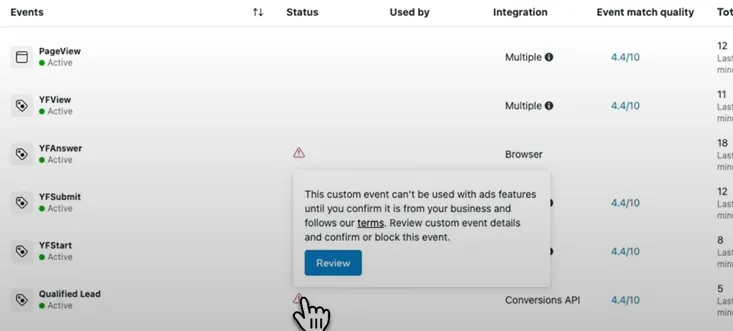
The step-by-step with screenshots of each Meta screen is in How to fix Meta Pixel events not appearing in the Facebook Events Manager. Once you’ve done it (or know you will after the first events arrive), check the box and click Save integration.
”I am aware it is recommended to exclude Audience Network from my ad placements”
Audience Network is the placement that shows your ads inside third-party apps and websites, outside Facebook and Instagram. On Yay! Forms, clicks from it almost never become responses: about 1% of those visits submit the form, against about 11% for visits from Feed, Reels and Stories. Since Meta charges per click or per impression, this placement spends budget without producing leads. It is not a bot problem and not a form problem: these are real devices on residential IPs, and no detection can filter that traffic.
To exclude it, open the ad set in Ads Manager, scroll to Placements, choose Manual placements and, under Platforms, uncheck Audience Network. Repeat for every ad set that points to a form (you can edit several ad sets at once). Labels vary slightly between Ads Manager versions; the official Meta reference is Best practices for using manual placements.
To see where clicks come from, add utm_source={{site_source_name}} to the ad URL: Audience Network visits arrive with utm_source=an and show up that way in your responses. Once you have adjusted your ad sets (or decided to keep them as they are), check the box.
6. Check what was sent in the Logs tab
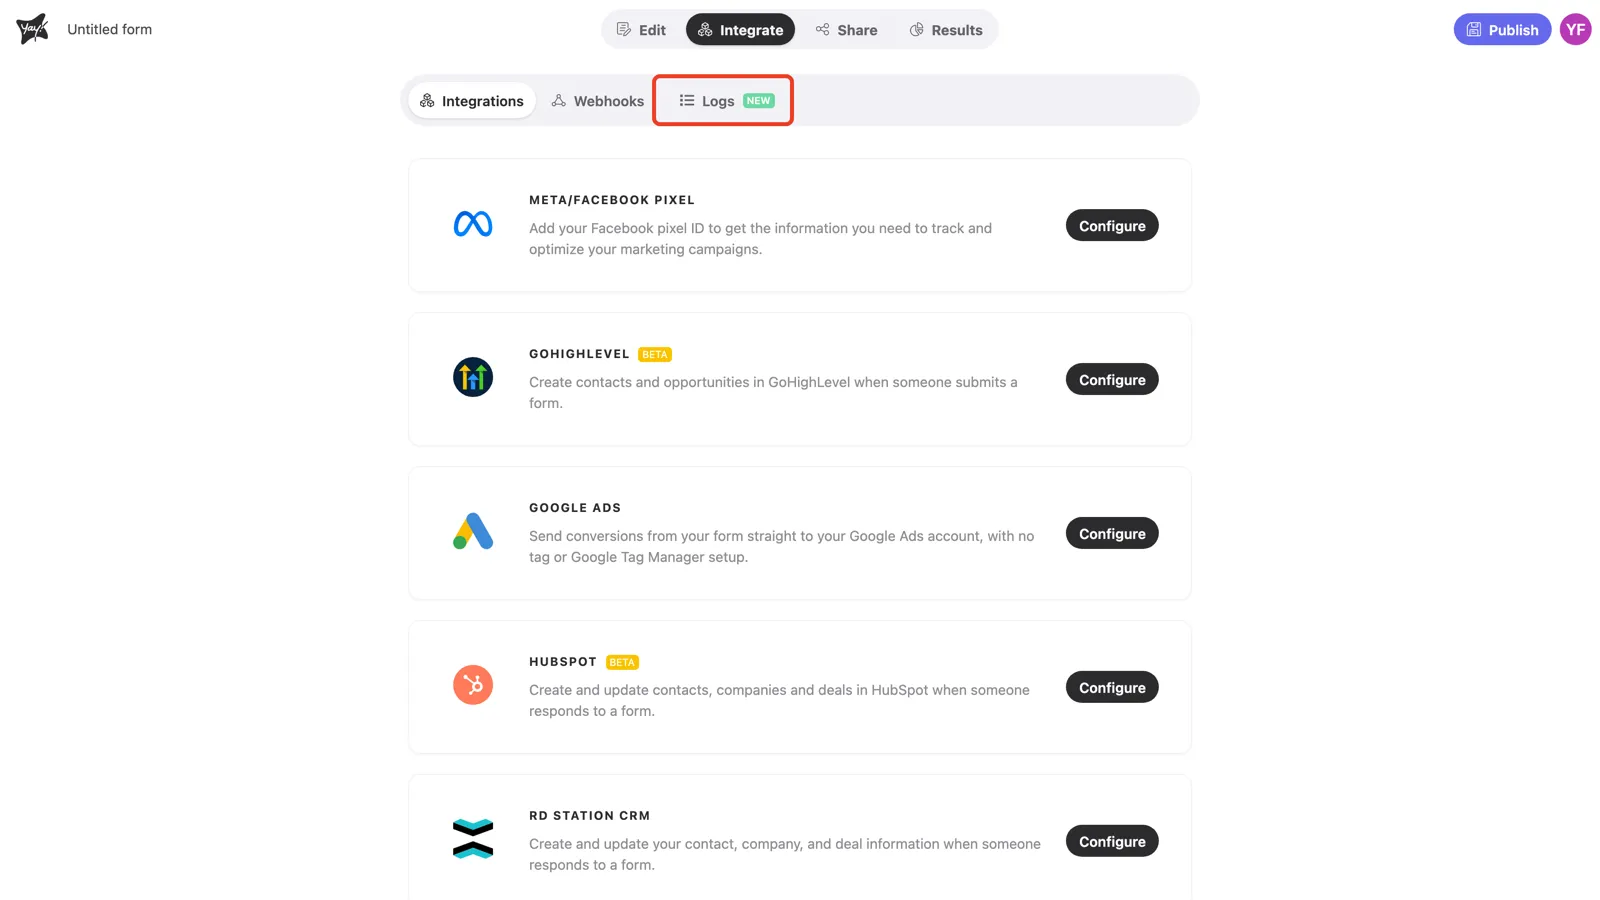
The Integrate screen has a Logs tab listing every integration execution for the form: the event, the timestamp, and whether the send succeeded. When you’re unsure whether the problem is on the Yay! Forms side or the Meta side, start here. A YFSubmit with the Succeeded status means Yay! Forms delivered the event, and anything still missing is one of the Meta-side checks from step 4. Details in How to view your integration logs.
7. Events Yay! Forms sends
| Event | When it fires |
|---|---|
| PageView | The form loads (Meta standard event, sent alongside YFView). |
| YFView | The form loads. |
| YFStart | The respondent starts filling in the form. |
| YFAnswer | Each answered question. |
| YFSubmit | The form is submitted. This is the event to optimize campaigns for. |
| YFIncomplete | The configured inactivity time passes with no new answer (requires the setting below; fires even if the respondent later submits). |
PageView, YFView, YFStart, and YFSubmit are sent both by the browser pixel and server-side through the Conversions API, with deduplication so Meta counts each one once. YFAnswer comes from the browser only, and YFIncomplete from the server only.
Sending events for incomplete responses
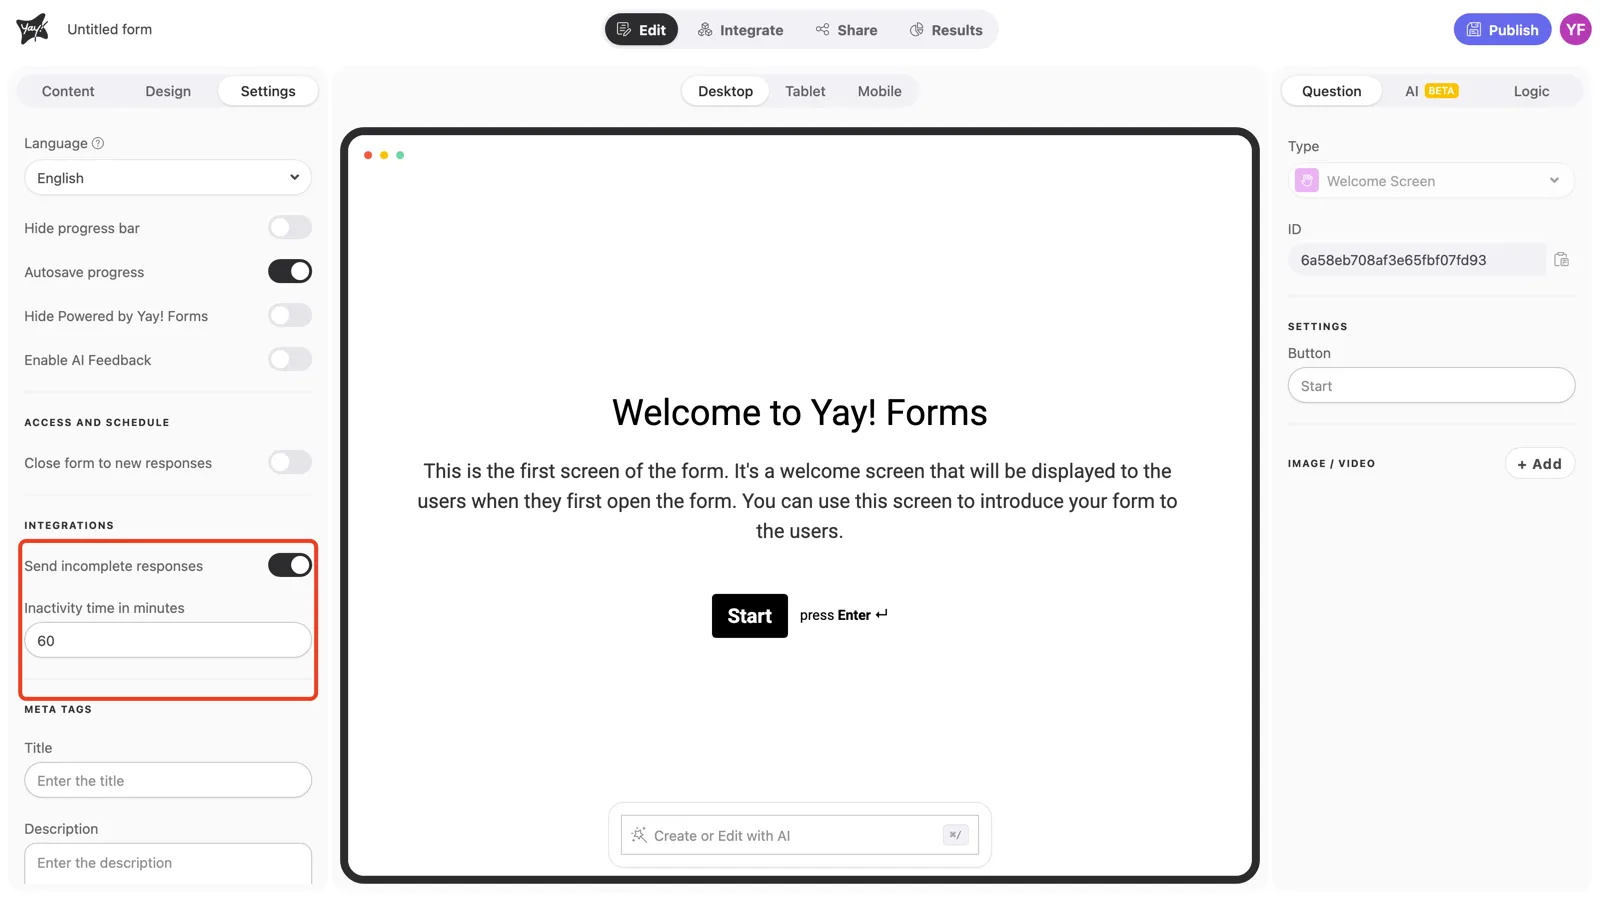
To fire YFIncomplete (and custom conversions whose conditions already match), open the form’s Edit tab, click Settings, and under Integrations enable Send incomplete responses and set the Inactivity time in minutes. When a respondent stops answering for that long, the partial response is sent to your integrations.
8. Before you launch: the end-to-end checklist
- Submit a test response with a Test Event Code active and watch it arrive in the Test events tab.
- Confirm the send in the Logs tab (YFSubmit with the Succeeded status).
- Approve the YF events (and your custom conversions) in Manage Event Blocking (guide).
- Confirm the traffic permissions allow your form’s exact address (
your-subdomain.yayforms.link), plusyayforms.linkand any custom domain. - Clear the Test Event Code to enter production mode.
- If the pixel and the ad account live in different Business portfolios, share the pixel with the ad account in Business Settings → Data Sources → Pixels.
- In your ad set, select the conversion event (YFSubmit or your custom conversion) after it’s approved.
- In the ad set’s Placements, uncheck Audience Network (why).
- Give Meta time to display events: the Test events tab updates within ~30 minutes while your test code is active; event activity in the overview can take a few hours (in some cases 24 to 48).
If events still don’t show up after all nine items, follow the diagnostic guide or contact support with your Pixel ID and form URL.
Good to know
- Embeds: while the Meta Pixel integration is enabled, the embed options on the Share tab are unavailable; share the form through its own link. We are working on lifting this limitation.
- Disconnecting: open the integration again and click Disconnect. To switch pixels, connect another Meta account in step 1.
- Expired token: if Meta invalidates your access token, Yay! Forms shows a re-authorization prompt when you open the integration. Generate a new token in Events Manager and reconnect.
Conclusion
You connected your Meta Pixel through the Conversions API, configured advanced matching and field mapping, created custom conversions with their own trigger conditions, and ran the confirmation checklist (test events, traffic permissions, and event approval) that gets the data flowing into your campaigns.
Related articles: